Friday, May 22, 2015

Paper-Pieced Stag Wedding Quilt


In December I began looking for the perfect fabric and pattern to make a quilt for friends that were getting married in April.

I wanted something hunting related or camouflage, but feminine at the same time, was that even possible?

Then I saw Brambleberry Ridge by Violet Craft in the Hawthorne Threads Newsletter. I fell in love immediately. I knew it was the perfect fabric.


I found several options for quilt patterns, but I was so drawn to Violet Craft's Forest Abstraction quilt, which is a paper pieced quilt. I decided to take the plunge and just do it. I decided to only try to do one block, the Stag, and then frame  it with coordinating fabric to make it larger.


I had a few complications as the process began, my printer doesn't print 11X17, so I traced the templates off of my computer screen. Yes, that was a bit crazy and I will definitely take the pattern to be printed if I do more in the future.

It had been quite some time since I paper pieced, so there was a bit of a re-learning curve. In fact I completely messed up the first 8 or sections. I had to re-trace those and start over. Also, I remembered why it is important to use the smallest stitch setting so that when you are removing the paper it comes off easily. I did not do that at first, and had some issues with my seams coming undone after I had put my pieces together.

I found this post (here) from the Violet Craft Blog helpful as I began piecing. Also, one of my very favorite blog posts/tutorials on paper piecing is from Six White Horses, you can find it here.

I think this project would have gone fairly quickly had I been able to dedicate several hours at a time to it, but unfortunately I can only steal a few minutes here and there between work, kids, the house, and church responsibilities. It took all of February and most of March for me to piece the Stag together. It was so rewarding to see all of the different pieces come together.


Once I got the Stag pieced together I had to make some decisions about framing it out so that the quilt would be the size I wanted.. 


I used Timber Valley in Fog from the collection along with more Cotton Couture Eggplant to create a lap sized quilt. I was a bit scared to quilt it because I didn't want to "mess-up" the Stag or the look of the quilt. I decided to take the plunge and free motion quilt around the Stag with a "tree bark" design. I used "very dark eggplant" Aurifil Cotton 40wt Machine Quilting and Embroidery Thread.


I had a very hard time capturing the quilting on camera. It did turn out very nice and was a great choice for the "rustic chic" quilt... 

My sweet in-laws and hubby helped me take the quilt for a little photo shoot before I had to give it away. I'll be honest, I fell in love with this quilt, and was a little sad that it wasn't mine to keep. But I was so thrilled to give it away to an awesome couple and I hear they love it! 


Thursday, April 16, 2015

Dr Seuss Birthday Party


January 25, 2015 Matias turned 1 YEAR OLD!!! It was so much fun to plan his birthday party! I planned a Dr Suess themed party. Here are a few of the things that I did...

Centerpieces

I made 8 or so centerpieces for the tables. I used $1.00 tin buckets and hot glued styrofoam balls into the bottom of the buckets, shoved tissue paper on top, hot glued cutouts of the #1 or the letter M, or Dr Suess Characters to shish-ka-bob skewers and stuck those in. Then I used curled pipe-cleaners, feathers (hot-glued to the skewers), and pinwheels to give each centerpiece its own look. The centerpieces turned out very nice and added a lot to the decorations.


Buntings and Banners

I wanted buntings for the cake and food table, the candy buffet, as well as over the windows. I used paper and my Cricut Explore to create the following buntings. 

For the #1 Bunting I cut out several large #1s, as well as printed Dr Suess "cupcake toppers" that I found online. I punched holes in these and threaded them on ribbon (I did hot glue them as well so they wouldn't slide around). Hung with balloons and ribbons on the side they worked out well. 


1-12 Months Bunting - I used my Cricut Explore to cut out circles of different sizes as well as numbers. I hot glued the circles to clothes pins and strung on a ribbon with pictures of Matias for each month. This bunting adorned the candy buffet. 


Happy Birthday Bunting - I made a template for the "triangle flags" and with a ruler and pencil drew lines and cut them out by hand. I used my Cricut Explore to cut the circles and letters. This large bunting was over the cake and food table.

Happy Birthday Matias


High Chair Bunting - I AM ONE - I used my Cricut Explore to cut out the squares and I printed the words for I-AM-ONE. 

High Chair Banner - I Am One

Quotes and Other Miscellaneous Decorations

I printed a lot of Dr. Seuss Quotes on card stock using free fronts I found online, then I glued the quotes to colorful paper and hung them on fishing line from the ceiling. 


As "filler" decorations I used Crepe Paper, Tissue Paper Pom Poms, Balloons, and Dr Seuss Cutouts. 


Truffula Forest Entryway


Tables and Stations - I had 4 tables set up to eat on, but we also had the food and cupcake table, as well as a candy buffet, and a sign in table. 

Party/Eating Room and Tables - Each table had an aqua or red table cloth, a centerpiece, two Dr. Suess books, and some Dr. Suess Character due cuts. 


Happy Birthday Book Table - I bought an inexpensive picture frame and hot glued die cuts to it, used scrapbook paper as a background and printed a sign. The sign said, "Stop here you see and write a very special message to me! A Birthday wish or just saying hi to your very favorite one year old guy! On the front, the back, or any pages it's something I will treasure all my ages.


Candy Buffet - Of course it was filled with lots of candy, but there were a few extra special touches, that made it a Suessical Candy Buffet. 

I included toothbrushes and a framed quote "Lots of sweets and candy may seem like dandy, but our teeth come in handy when we want to smile. So take a toothbrush and brush real good so you can keep your teeth around for awhile!" 

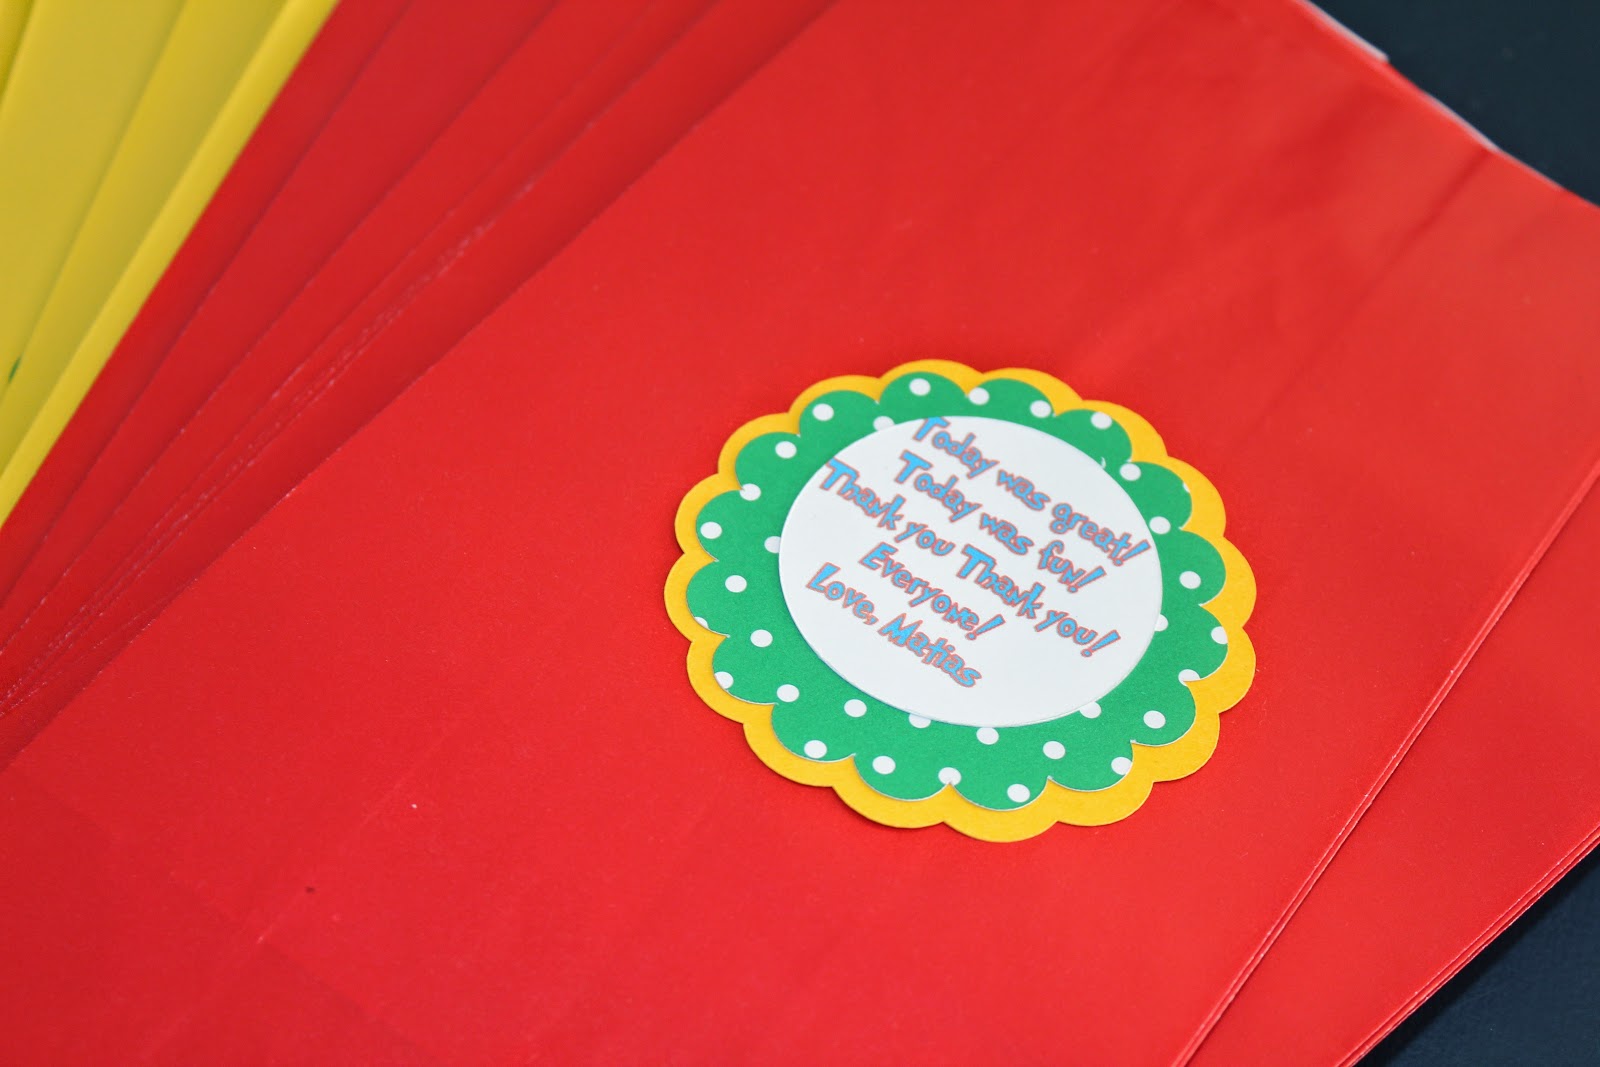
I made labels to go on paper goodie bags that said, "Today was great! Today was fun! Thank you Thank you Everyone! Love, Matias" 


Food and Cupcake Table  


We had Green Eggs (deviled eggs) & Ham


I printed the Dr Seuss circles and then used my Cricut to cut out the scallops and then hot glued them to lollipop sticks. 

I made the cupcakes - strawberry with cream cheese filling and chocolate with chocolate mousse filling. 

Nate (my husband) made this really fun and whimsical cup cake holder. 


Food - Unfortunately I didn't get pictures of the food... Things got kind of crazy right as guests were showing up and the pictures didn't get taken. We had Roast Beast (Smoked Brisket), Green Eggs & Ham, Poodle Noodles (Pasta Salad), and Chips. To drink we had Once-ler Wassail and Pink Ink Drink (Sparkling Strawberry Limeade). 

Birthday Boy's Outfit - I made a diaper cover, bow tie and suspenders. 


We had a lovely first birthday party for our baby boy and I am so glad that Nate convinced me to go with the Dr. Seuss theme! It was so much fun to plan and create a Suessical Party for my little guy!


Monday, February 2, 2015

Back to Crafting, Sewing, Quilting, and Blogging... I hope!

It's hard to believe that it has been a little over a year since our "surprise" baby boy was born. What a year it has been. So many blessings to be thankful for, but quilting, sewing, and most crafting has been very sporadic, and blogging about anything I did do just didn't happen. He keeps me busy, as do his brothers. He is so adorable and charms everyone he meets, pics included so you can see what I am talking about!


In September school started and my middle son began Kindergarten. It is my first time home schooling Kindergarten, as my older son didn't begin home schooling until First grade. Any "free time" I had was put into researching and executing fun learning activities, and LOTS of laminating and cutting! I have completely fallen in loved my laminator!

In October I helped with our church's Harvest Fest. As usual it was a lot of fun, but many late nights spent at the church as a family. All 3 boys were troopers! I wanted an inexpensive way to bring "Fall" into our church so I learned how to make Tissue Paper Pom Poms... I think everyone thought I was nuts when I kept saying, "no we need more!" BUT I think they turned out so beautiful. My husband and I spent 2 weeks making these trees out of a paper mache type clay.


I chose a theme for Baby Boy's first birthday in October and whenever I could steal a minute on Pinterest I was pinning away! I was so excited about doing a Dr Suess party. Unfortunately I really couldn't start executing any of the ideas until after Christmas.

I agreed to teach a women's Bible Study at our church in November and December, and I had the idea to do a study through the Jesse Tree and by the end of the study each woman would have her on set of 24 felt ornaments. Much of November and part of December was spent cutting out felt pieces for the ornament kits. I must admit that was quite an undertaking while working my accounting job, homeschooling, keeping a home, and taking care of a baby who still nurses every couple of hours. The ornaments were very simple, but since I had to cut 480 felt circles, and all of the pieces for 240 ornaments, they had to be fairly simple! I am so happy I did it and I really think the ladies in the study enjoyed it.


6 of the 24 ornaments

My Jesse Tree


I had plans for several Christmas presents that would involve sewing and some other crafting aspects... But my husband had an ATV accident the day after Thanksgiving and I had to make some hard cuts on the homemade Christmas gifts! He injured his wrist and was unable to move it, so he couldn't help with the baby and he couldn't cut some of the wooden pieces I needed for a couple projects. The only handmade gift I finished was for my In-Laws. I made a Family Celebrations board for them. There are a lot of us, with 7 kids, spouses, grandkids, and one great grandbaby. I really wanted them to have this wall hanging for their home.


Christmas was lovely, we spent it in Minnesota and Wisconsin with Family and Friends. The day after we arrived home I went into full-on PARTY PLANNING MODE! The party was scheduled for January 25th and I had 24 days to execute all of my ideas!

My next blog post will be all about the party, the pic below is just to show off the Star of the Show!


With a Bushel and Peck of Love,
Jessica